Accept donations quickly: Adding a Donate button to your site in minutes.
- Log into your PayPal Business account.
- Click Tools at the top of the page, and then click PayPal buttons.
- Select the Donate button.
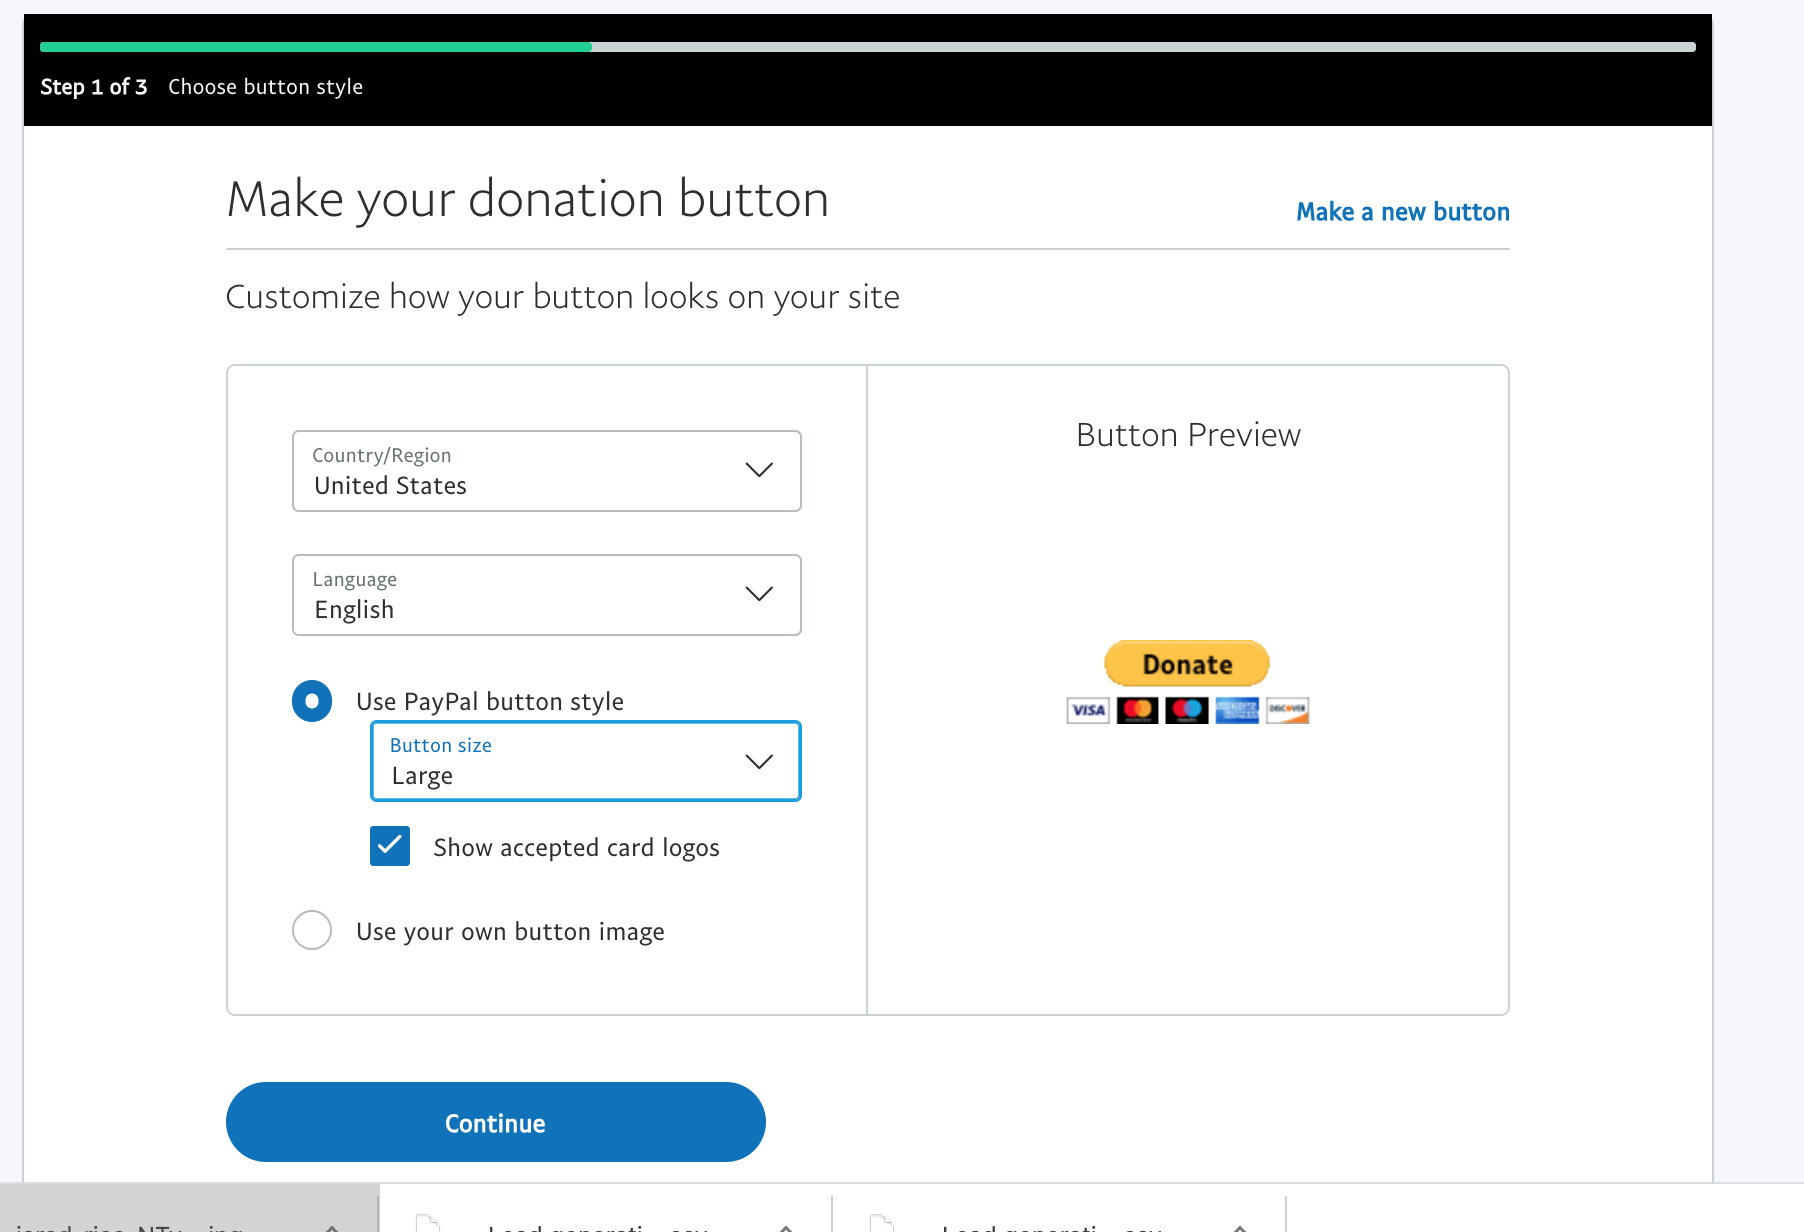
- Enter the item name and price. You can also customize the button with additional features. Click Create Button.
- Click Select Code to select the button code.
- Copy and paste the button code into your own web page code where you want the button to appear. Repeat the above process for every page where you want ...
- This new button will appear on the "My Saved Buttons" page if you’d like to edit it at any point.
Accept donations quickly: Adding a Donate button to your site in minutes
- Log into your PayPal Business account.
- Click Tools at the top of the page, and then click PayPal buttons.
- Select the Donate button.
- Enter the item name and price. ...
- Click Select Code to select the button code.
How do you make a PayPal donate button?
Apr 07, 2020 · Your PayPal Business account username and password; Access to your website’s HTML code Step-by-step instructions (total time: ~10 minutes per button) Log into your PayPal Business account. Click Tools at the top of the page, and then click PayPal buttons. Select the Donate button. Enter the item name and price.
How to add PayPal donate?
To add a Paypal donate button to your website, please follow the steps below: Login to your Create account; Click on "Content" in the top menu; Click on "Widgets" on the left-hand menu; Click on the "Add Widgets" link ; Choose the "PayPal 'Donate' Button" widget ; You will need to customise the Widget to your requirements; Save your changes
How do I create a PayPal donation link?
Oct 11, 2021 · When you have created the PayPal button, you will get a shortcode which you need to place where you want to display the donate button. Go to Donations->Settings page and add your PayPal email address. Just place your shortcode anywhere you want. The donate button will appear on your website.
How to add a Donate button to your website?
Go to your GoDaddy product page. Scroll to Websites + Marketing and select Manage next to your site to open your site. Select Edit Website or Edit Site to open your website builder. Go to the page and location you want to add the PayPal button, and add a section. Search for the PayPal Button section and select Add next to the layout choice you want to use. Select your section to …
Streamline your fundraising
In 4 easy steps, create a Donate button for your website, no programming skills required.
Easier donations are 4 steps away
Follow our simple instructions to set up your org anization’s Donate button.
Keep your fundraising costs down
PayPal offers discounted transaction rates for confirmed 501 (c) (3) charities for most products, with no setup, statement, withdrawal, or cancellation fees.
Getting Started
The first thing you should do is head over to Paypal’s Fundraising Page and pick which category of donate button would work best for your needs:
After Picking Personal
On the next page, scroll down until you see the text “Learn about creating a donation button” and click it.
Creating the Button
When you click the link to create a donate button, it will take you to the page where the magic happens. You should note, however, that Paypal will not prompt you to log in. Repeat: Paypal will not be prompt you to log in. You will be able to toward the end of the process, but don’t stress about it at this point–nothing has gone wrong.
The Paypal Donate Button Code
On the next page, you’re finally be given the donate button code that will live on your WordPress site, as well as an example of what the button will look like to your users.
Two PayPal Donate Button Methods
Two PayPal button creation methods exist. The first option involves walking through the official PayPal website and taking one of the pre-made Donate buttons from the site. You would then connect your PayPal account and embed the button wherever you want on your site.
Option 1: PayPal Donate Button for WordPress via PayPal Website
Navigate to the PayPal Fundraising page. This webpage lists all of the rates and features for when you add a PayPal Donate button to your website.
Option 2: PayPal Donate Button with a WordPress Plugin
The best way to create a PayPal Donate button is by using the method above. The reason for this is that you don’t have to worry about updating extra plugins or how it might impact performance. Having said that, we understand that some people enjoy working with plugins, or they find even the thought of code intimidating.
Donate With PayPal in eCommerce Solutions
If you’re using an eCommerce solution such as WooCommerce or Easy Digital Downloads, you might want to also check out these following plugins as they can help integrate donations into your checkout process.
Summary
You’re most likely going to customize the pages and posts to have more content and explain what the donations are for. However, these methods are the best options to create PayPal Donate buttons without any problems. You’ll also notice that the PayPal Donate buttons have several customization tools along the way.
How to add multiple items to your shopping cart?
If you sell multiple items on your site, choose the "Shopping Cart" button to let your customers add an item to their shopping cart. Enter the item name and price. You can also customize the button with additional features. Click Create Button. Click Select Code to select the button code.
Can you edit a button?
You can always edit your button. Click here to see how. Tip : If you'd like to allow your customer to provide feedback, create a 'Text Entry' field and name it. This field will appear above your button. The 'Email URL' option is only available if you are not using any drop down menus, text boxes or user selections.

Getting Started
- Subscribe To Our Youtube Channel The first thing you should do is head over to Paypal’s Fundraising Pageand pick which category of donate button would work best for your needs: 1. Nonprofit 2. School 3. Political 4. Personal Pretty much everything you could need a donate button for should fall into one of those categories. For this tutorial, we’re going to say that you’r…
After Picking Personal
- On the next page, scroll down until you see the text “Learn about creating a donation button” and click it. That will bring up a modal where you’ll click one of these two links. They take you to the same page, so it’s really just a matter of preference.
Creating The Button
- When you click the link to create a donate button, it will take you to the page where the magic happens. You should note, however, that Paypal will not prompt you to log in. Repeat: Paypal will not be prompt you to log in.You will be able to toward the end of the process, but don’t stress about it at this point–nothing has gone wrong.
The PayPal Donate Button Code
- On the next page, you’re finally be given the donate button code that will live on your WordPress site, as well as an example of what the button will look like to your users. Click on Select Code to highlight your code and hit CTRL-C if you’re on Windows, CMD-C on Mac, or right-click the highlighted text and select Copy from the context menu. Pick your poison. Once you have copie…
You’Re Ready to Get That Money!
- Now you’re totally ready to add a Paypal donate button to your WordPress site! No matter what theme your site is running or what you’re taking donations for, you’re good to go. (But let’s be honest with each other–it’s still for a puppy, right?). Article image thumbnail by mohamed1982eg / pixabay.com
Popular Posts:
- 1. where to donate a car for charity
- 2. how to donate car in california
- 3. how to donate a car in pa
- 4. where donate blood
- 5. where can i donate my vehicle
- 6. where do i donate my car
- 7. what is the best charity to donate a car
- 8. where is the best place to donate a car
- 9. where to donate cars
- 10. where to donate my car for charity